![]()
![]()
![]()
![]()
![]()
![]()
![]()
![]()
![]()
![]()
![]()
![]()
![]()
![]()
![]()
![]()
![]()
![]()
![]()
Boat: "Rhumb Do"
Water-maker: Schenker Smart 30.
Some things on boats are precious, - fuel, electricity, cooking gas and WATER.
Not all water supplies can be trusted!
A water maker is expensive, that's a fact......but they put an end to wondering what sort of water you are going to get - and how much you are going to get! Unlike the water supplies we're used to in the United Kingdom, some countries are decidedly 'behind' when it comes to water purification. We've all heard of Delhi belly, Karachi crouch and the "don't eat anything that isn't cremated in Egypt, don't have ice cubes, don't eat salad washed in 'fresh' water." A water-maker, by and large, removes the worry of rationing your water supplies, you no longer rely on catching rainwater in your adapted awnings - and you can basically have a shower whenever you want! So, I bit the bullet and decided to buy a 'desalination machine' for Rhumb Do.
There are several makes to choose from and discussions between cruising yotties about the pro's and con's of each can be heard at the bar on most nights. I even considered building my own and obtained plans and instructions to that end. However, time, difficulty in obtaining suitable high pressure pumps and membrane housings, plus basic laziness dictated that I buy a commercial unit and after careful consideration, I opted for the Schenker - not the cheapest, but reputedly the most efficient with regard power consumption, a good reputation and the availability of spare parts and filter cartridges.
At the 2009 London Boat Show, I purchased the Smart 30 model from Jim of Mactra. Specifications are an output of 30 litres an hour (probably nearer to 25) and a power consumption of 9amps on a 12volt system. As my fresh water tank is only 220 litres, and present usage is between 5 and 10 litres a day when at sea, it should prove ample for my needs and hopefully with the additional solar panel electrical output, I will only need to run the engine for short periods to re-charge my batteries.
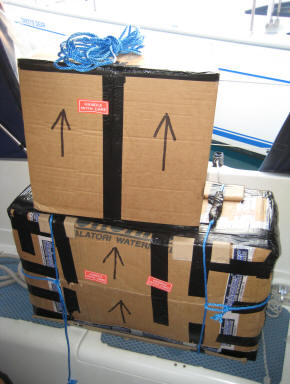
So.....the whole thing was too heavy and cumbersome to bring back via Thomas Cook from Gatwick to Dalaman airport and I had to break it down into two boxes for transportation. Even then, it was a struggle on the inadequate airport trolleys!
Here are the two boxes onboard Rhumb Do, taking up almost the entire port side cockpit seat while I pondered the problems of where to fit the various parts within the limited space onboard.
The membrane, pump, filters (and water contained within) weigh in excess of 40 kgs and the diesel fuel tank is situated on the port side (in the locker under the boxes), so I really wanted to fit the water-maker on the starboard side of the boat so as not to induce a list to port.
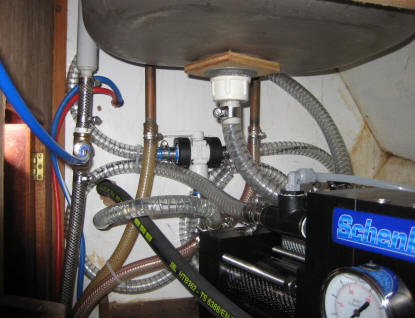
I would have to install the membrane in the cupboard under the galley sink, and the pump and filters in the bottom of the forward cabin wardrobe, passing the connecting hoses through the bulkhead.
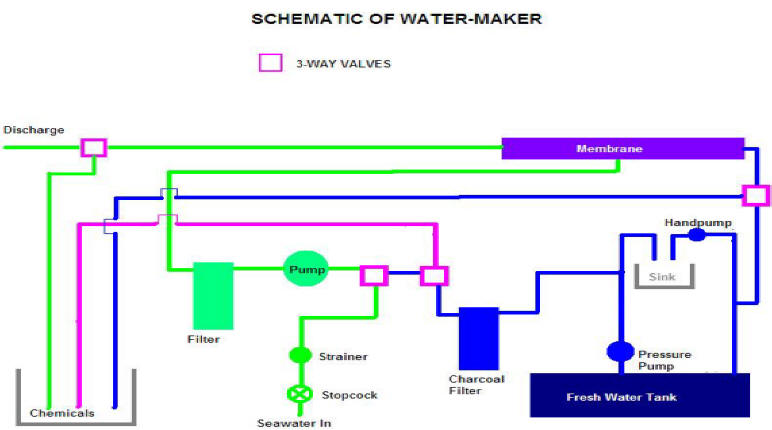
The first thing needed was a schematic drawing of the installation so that I could make my final plans on the location of each part.
Let's start with the basics.
Seawater contains about 10,500 to 14,000 parts per million (PPM) of total dissolved solids (TDS), mostly salt (the terms TDS and PPM are generally used interchangeably). Drinking water has less than 500 TDS. Water makers make fresh water from saltwater through a process known as reverse-osmosis desalination. It is really quite a simple process. Sea water is pumped at high pressure (about 800psi) against a semi permeable membrane. Some of the water molecules can be forced through the membrane, while the salt molecules, being larger, cannot. Basically you're just filtering on a molecular level.
Only about 12-15% of the water passes through the membrane and comes out as fresh water, so the rest of the water around the membrane becomes saltier, this water is known as brine water. In order to regulate the pressure in the membrane and to get rid of the excess brine, some of the seawater is bled off via a pressure regulation valve. This excess brine water is discharged overboard. The water that passed through the membrane is pure, fresh drinking water, usually with less than 300 TDS; it is referred to as product water and it goes into your tanks (see above diagram). Pretty simple huh?In my Navy days, we used steam powered, vacuum controlled evaporators - basically a large container with a steam coil in the base. The container was under vacuum (because water boils at a lower temperature under vacuum) and the sea water was boiled by steam passing through the coil. The steam created as the sea water boiled was piped away and condensed into fresh water. Each evaporator produced in excess of 1 ton of pure distilled water per hour.
However, small yachts cannot use that system.......so back to the fitting of a smaller, different version!
Starting with the pump and filters.
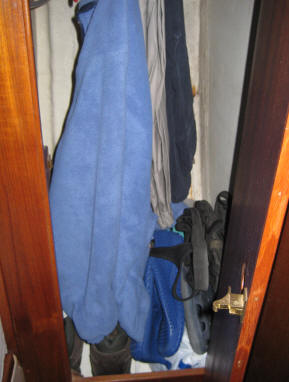
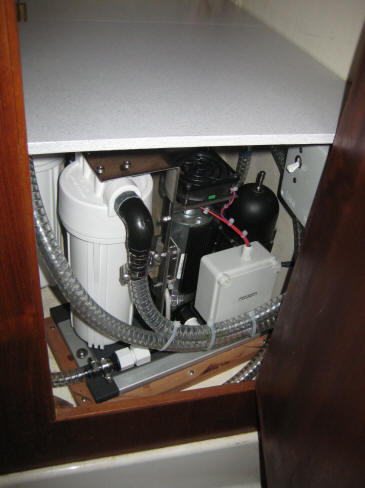
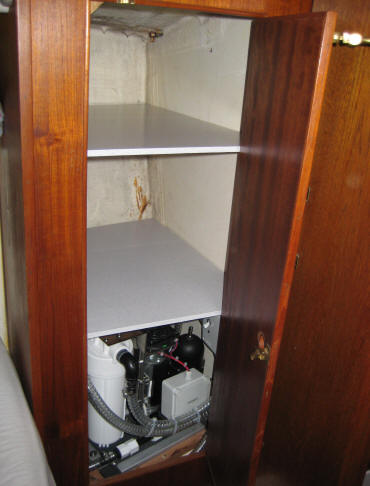
This is the fwd cabin wardrobe where these were to be sited - the shoes, jackets and trousers would have to find another home!
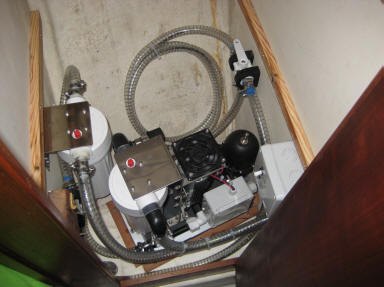
On the deck of the cabin, in front of the wardrobe, is a small hatch giving access to the seacock which supplies water to the toilet. I would 'T' into this for the pump suction, bringing the pipe up through the wardrobe floor via a 50 micron strainer - an item which proved difficult to obtain in Marmaris and had to be ordered from the UK. (see updates)
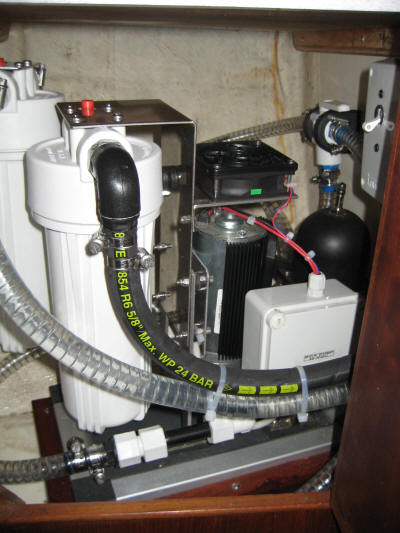
The pipework was easier to run than I first imagined but the cramped working space was a nightmare - the wardrobe is only narrow and I needed to squeeze my shoulders through the door in order to fix the pump base plate, mount the filters and screw up all the jubilee clips which connect the three way valves needed during normal use, flushing the system after use and lastly, 'pickling' the system with chemicals when not in use for some months - such as a lay up on the hard, or a prolonged stay in a marina.
After a few days of colourful language and nautical expressions which you will have difficulty finding in the Oxford English Dictionary, I finally had everything in place. The coiled hose at the back of the wardrobe is the suction hose used when 'pickling' the membrane, and will be led to a five gallon drum of chemicals when needed. The hoses are 16mm internal diameter and all the connections were double clipped. The 15amp circuit breaker was made by carefully cutting a hole in a waterproof junction box, mounting the breaker inside and screwing it to the bulkhead on the right of these photos. I used 10mm2 marine cable for both the pos. and neg. feeds to the circuit breaker from the main panel.
Adding a couple of removable shelves (10mm plywood) to give storage space in the top part of the wardrobe finished this part of the installation - with the exception of cutting ventilation grills into the door.
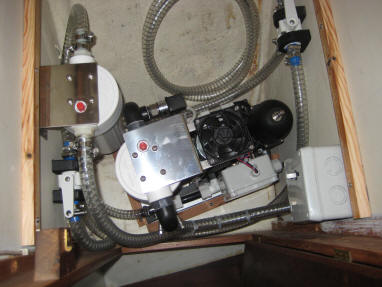
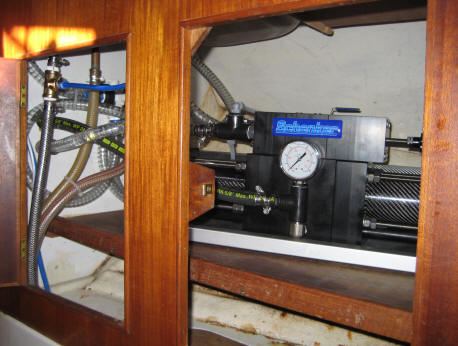
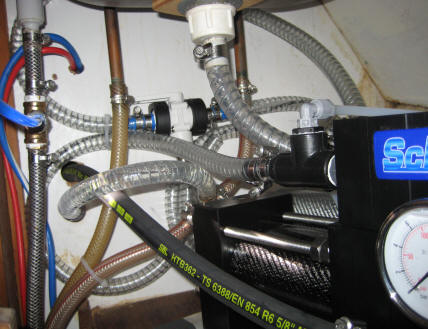
In all the above photographs, one pipe was for measurement purposes only and was later replaced with high pressure hose to take water from the 5 micron filter to the membrane - as below.
Both filter bodies can be unscrewed and removed for element replacement despite the deceptive angle of the above photographs.
Now for the membrane part of it!
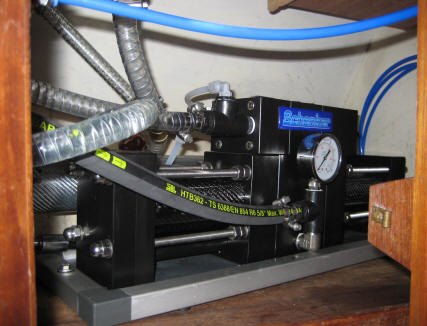
This particular model has to be mounted in a horizontal position (some types can be mounted vertically), hence my choice of site - the cupboard under the galley sink. At first, because the cupboard has two small doors with a 4 inch vertical piece of wood in between, I thought the whole of the cupboard front would have to be removed and re-designed, but removing the sink waste pipe, then tipping the membrane on it's side and wriggling it around (more naughtical language), allowed me to position the unit on the shelf and bolt it down.
The spaghetti of pipework was then planned out, cut to length and various sizes of connectors obtained to allow 'T' joins within the pipes of differing sizes. The new pipework is 16mm internal diameter, the old is half inch imperial, the sink waste is 19mm and the 'product water' pipe is 6mm - all had to be joined and include 3-way valves and a non-return valve on the sea water discharge (hidden behind sink in photo). Fortunately, replacement of the membrane itself isn't a job that has to be done every five minutes - more like every five years (with proper maintenance and flushing) - and it should just entail disconnecting the pipes to the unit and removing it complete from the cupboard onto a workbench.
The small diameter (6mm) blue pipe is the product water pipe, and is plumbed into the sink hand pump supply - that's because I have a flexible water tank which collapses as it empties and so requires no breather pipe. For a rigid tank, this pipe would have to be connected to a quarter inch connector tapped into the tank top, or into a breather pipe providing the pipe was at least 16mm internal diameter.
The next two jobs were not without their problems. Firstly, I had to hook up the electrics to the main panel bus bar - and on my boat, that means taking down the nav. berth deckhead in order to remove the bulkhead panelling complete with inverter to get to it. That's a day's work. Secondly, the raw water pre-pump strainer should have been a straight forward job of cutting into the heads intake, inserting a t-piece, then the strainer and connecting to the pump suction pipe......but like all such 'simple' jobs, it turned into a marathon undertaking.
The installation manual for this water-maker stipulates that the filter/strainer MUST be one of 50 microns. I was unable to find one! One ordered from the UK via an on-line catalogue, eventually arrived some weeks later but turned out to a 50 mesh filter, which equates to around 300 microns. Following several e-mails to both the chandlery involved and the supplier of the water-maker, it was decided to fit the 50 mesh filter which I now had. However.......removing the pipe from the seacock was impossible and I finally had to cut it off. I now discovered that the pipe was the approximate imperial equivalent of 19mm, so now I needed a t-piece with two 19mm connectors and one 16mm connector. Furthermore, the filter connectors were half inch! The marina chandlery were unable to help and I could not re-connect the heads intake because the pipe was of an unknown age and had become hardened and inflexible. A day later, following a search for suitable connectors and sanitary hose, the water-maker was finally connected to sea via a complete new heads supply pipe. (See update 3)
It just remains to cut ventilation panels into the wardrobe door - and I should be in the water making business!
I will update this when I have left Marmaris and am out at anchor - and have tested the installation.
Update 1: 23rd July 2009.......It's now over seven weeks since I left Marmaris Yacht Marine and I haven't needed to take onboard any water from external sources during this time. The water maker is working without problem though I do need to look at the flushing pressure from my fresh water pump, which doesn't appear to be sufficient. Production of water is as promised, around 30 litres per hour (well, it filled a litre bottle in two minutes!) Battery drain is easily covered by the solar panel - wall to wall sunshine every day - so it hasn't been necessary to run the engine, although when it is running I switch on the water maker as needed. Scale in the kettle is none existent and the water from the tank tastes good - so I'm well pleased at this moment in time!
Update 2: 29th January 2010, location - Suakin, Sudan. After six months of trouble free usage, the unit started to play up on the approach into Suakin. Whilst in use, the pump suddenly stopped, with the manometer showing a high pressure of 10 bar. The seas were quite rough and I at first put the fault down to this, although the unit is mounted horizontally and longitudinally in the boat, so it shouldn't really make any difference. However, later at anchor, the fault persisted despite going through all the maintenance and corrective issues described in the (poorly written) manual. The pump would not self-prime when switched to sea water intake and I suspected the 5 micron filter to be a suspect cause as this was renewed in Hurghada, Egypt - not by the original paper pleated type, but by a sort of compressed polyester type. After three days of trying to sort the problem out, and phone calls to the supplier, I replaced the filter with an original pleated type and although it should not make any difference, it does!! The unit is now working correctly again.
Update 3: 1st July 2010.......It became apparent sometime ago, that things were not as they should be. The watermaker kept cutting out with either high pressure or (more likely) loss of pressure entirely. Some other yotties who have the same model have removed the pre-pump strainer (which the manual insists must be 50 micron) and now run their units without any initial filtering. Others have advised that the pump cannot 'suck' through a filter and must in fact 'push' the water through any restriction. In my case, after much deliberation, I put the fault down to the shared suction with the heads inlet (a Lavac toilet), reasoning that the pump suction was taking the easiest route and emptying the pipe between the t-piece and the heads bowl, thereby eventually sucking in air instead of water from the seacock. I disconnected the heads intake and connected the watermaker pump directly to the seacock - and this cured the problem. A shared intake pipe may be OK with a Jabsco toilet or some other make, but if you have a Lavac, then in my opinion you will have to fit a dedicated seacock for watermaker use only.
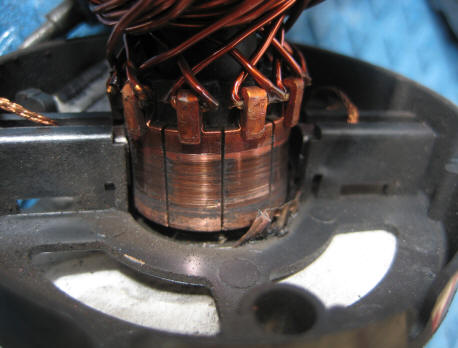
Update 4: October 2010......unable to use the watermaker in Langkawi because of dirty anchorage water, I decided to pickle the membrane. However, the pump again would take a suction and eventually, making a horrible mechanical noise, ground to a halt. Stripping the unit down revealed that the motor commutator was totally wrecked by a jammed piece of brass/copper which appeared to have come from around the top bearing assembly. Jim MacDonald of Mactra said he had never seen a pump motor damaged in such a way and kindly sent the photo's to Schenker who were not very helpful. Jim as usual, was more than considerate and forwarded me a new motor at cost price.
Update 5: December 2010.....whilst hauled out of the water in Chebilang, Thailand, I fitted a dedicated sea water intake valve - something which I advise as 'essential.' This of course allowed me to reconnect the heads intake and have a working toilet again!