

![]()
![]()
![]()
![]()
![]()
![]()
![]()
![]()
![]()
![]()
![]()
![]()
![]()
![]()
![]()
![]()
![]()
![]()
![]()
Boat: Rhumb Do Date: September 2018
I am replacing my old Rotostay II furler with a new Pro-Furl C350.
As I have been asked how to dismantle the bearings in the past, I thought I would note down a few tips before I forget!
My forestay is 8mm diameter.
FIRST you have to take down the forestay. If you haven't done this before....rig a spare halyard to the bow roller fitting, then slacken your backstay(s). Tension the halyard, slacken off the forestay bottlescrew and disconnect the toggle fitting to the deck. Then go up the mast, tie a rope around the furler extrusions and disconnect the top shackle. With one or two helpers on the ground/pontoon, lower the forestay down, keeping the foil as straight as possible.
So, this is the drum end of the forestay on the pontoon.
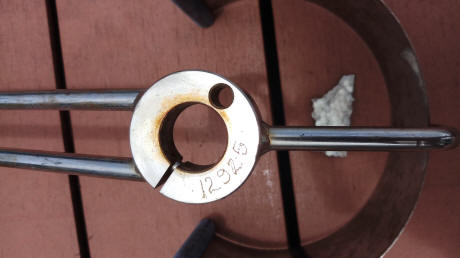
Remove the furling line guide by taking out the machine screw (allen key) from underneath the drum. On the underside is an engraved number, presumably the number of the whole Rotostay unit.
Remove the machine screw that attaches the foil to the bearing housing (right arrow), then remove the drum from the lower bearing housing by tapping out the plastic pin (left arrow) and sliding the drum downwards.
You now have the lower bearing housing with the foil loose on the top spigot.
Separate the housing from the foil.....
.....and unscrew the forestay from the bearing housing.
You can now take the housing home and service it in comfort!
Tap out the roll pin from the top of the bottlescrew with a suitable size drift and unscrew the bottlescrew from the housing.
Using an allen key, undo the grub screw beneath the sail horn,
The top and bottom parts of the housing will now unscrew.
Now you can remove and replace the bearings. From left to right in this photo is the foil spigot and sail horn, upper plastic washer, the lower spigot with ball race and two thrust washers, the bearing housing, lower plastic washer, needle roller bearing and finally an oil seal. All shown in the order they should be.
Now it's a simple job of fitting new bearings and reassembling in reverse order.
The top bearing is a similar, though a little easier operation.
Shown in this pic. is the roll pin and grub screw you need to remove. If you are doing it in situ, then only the grub screw needs to be removed.
Tap out the roll pin and unscrew the bearing housing from the forestay.
Remove the grub screw........
.......and unscrew the two bearing halves.
Tap out the roll pin securing the bearing in place.
Unscrew and remove the ball race and thrust washers.
Renew the bearing as necessary and reassemble.
When reassembling, the two roll pin holes should be in line.
Now, that was very easy wasn't it?
If anyone wants these bearing holders to renovate their Rotostay, send me an e-mail before I bin them!!


.jpg)
.jpg)
.jpg)
.jpg)
.jpg)
.jpg)
.jpg)
.jpg)
.jpg)
.jpg)
.jpg)
.jpg)
.jpg)
.jpg)
.jpg)
.jpg)
.jpg)