

![]()
![]()
![]()
![]()
![]()
![]()
![]()
![]()
![]()
![]()
![]()
![]()
![]()
![]()
![]()
![]()
![]()
![]()
![]()
Boat: Rhumb Do Date: June 2020
Whilst flushing the engine cooling jacket following an overheating problem, the engine revs suddenly shot up to 2000rpm and steadied there. Subsequent engine starts had the same result of high revving idle speed.
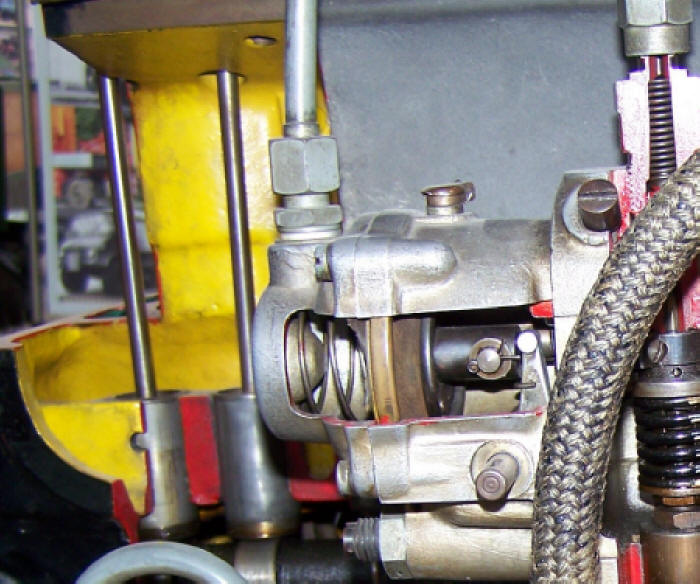
My engine, a Mercedes OM636, is fitted with a pneumatic governor which is attached to the end of the fuel injector pump, so I thought the diaphragm inside the governor must be split, damaged, or brittle through age. Fortunately, they are still available from Westfield 4x4 in the UK, so I ordered one and it was delivered to Labuan in about a week.
Access is the main problem for me, the engine sits snugly in the bay with very little room to get down either side, so it was a case of using mirrors, lights and doing most by 'feel' rather than being able to see.
A cut-away view of the governor showing the inside workings. The diaphragm is the copper coloured part (it's actually leather and aluminium), the black part attaches to the fuel rack control arm. Left of the diaphragm is the vacuum part and right is the atmospheric part. The pipe into the top of the housing is the vacuum pipe from the air inlet manifold.
Remove the vacuum pipe from the top of the cover - banjo bolt and two copper crush washers.
Cut and remove the security wire.
Then remove the four machine screws, taking care to hold the cover in place as it will be forced away from the governor body by the spring inside. Inside is a spring and one or two shims which you don't want to lose!
With the cover removed, you can see the diaphragm. Carefully remove the outer aluminium ring from the housing using a screwdriver on the inside edge. If you are replacing the diaphragm, it doesn't really matter if you damage the actual leather part but if you plan on re-using the same one, then you have to be very careful.
Once the outer ring is out, you will be able to pull the diaphragm outwards a small way to allow access to the securing pin inside. On the cut-away photo, you can see the horizontal pin of the control arm, secured by a split pin to the diaphragm body. Remove the split pin and washer, and slide the diaphragm towards the outside. That black part of the diaphragm body is actually a hollow cylinder, inside is a piston with spring and shims, so you have to put a finger over the end as you slide it off the control arm, so the insides don't fly out!
Once it is off, it's just a case of putting the new one on by reversing the process, then replacing the cover and vacuum pipe.
This photo shows my new one in position.
It's a fiddly job when you are hanging upside down with very little room to get your hands or tools in. Much easier of course if the engine were removed!


.jpg)
.jpg)
.jpg)